How To Reinforce Render
Render and plaster might easily crack under stress and deflation in the process of building construction and in usage. Fibreglass reinforcing mesh and metal mesh laths are used to prevent or decrease such cracking or fraying. Fibreglass mesh is a cheaper lightweight product of high strength and can be used successfully in the formation of external render as well as use on internal wall and ceiling surfaces. These reinforcing meshes protect the render layer surface from cracking and increases the mechanical strength of it. They also provide a better grip with the wall and significantly strengthen the render layer and significantly extend its service life.
Reinforcing render or plaster with metal lath
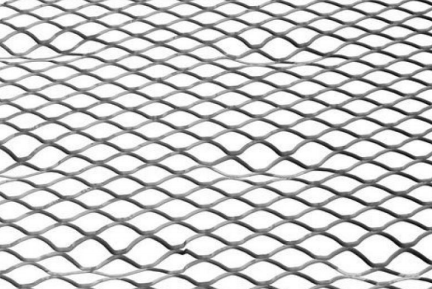
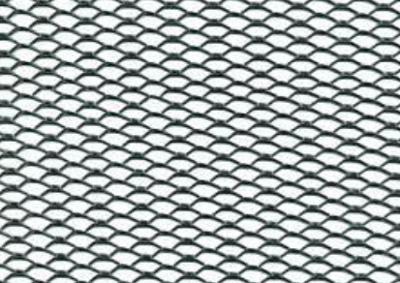
Metal lath is manufactured from steel sheets that are slit and expanded to form small diamond openings (approx. 9000/m2). These openings provide for plaster keying, which gives better bonding in either pumped or rowelled render applications. The render must be forced through the diamond mesh to ensure correct embedment. The metal lath should be embedded at least half the thickness of the render.
The metal lath is made from cold rolled metal sheet and given a galvanise coating. Metal lath is manufactured from hot dipped galvanised steel and also from stainless steel. Metal laths are used to hold Portland cement plaster or render to the structure and sometimes used with gypsum plaster.
Types of metal laths
- Flat diamond mesh metal lath,
- Self-furred diamond mesh metal lath,
- Rib lath,
- Corner lath (Cornerite),
- Strip lath
Flat diamond mesh metal lath is a galvanised metal lath nominally 3.2mm (1/8) thick by 686mm (27) wide by 2348mm (96) long. The sheet weighs between 1.3kg to 1.8kg. It is also available in stainless steel. Flat diamond mesh metal lath is generally applied to wood or metal studs in open frame construction. The flat mesh could be used over a solid surface using a suitable fixing that will keep the sheets firmly in position and give the furring mechanism, which will cause the render to bond in to the lath and complete the embedding process.
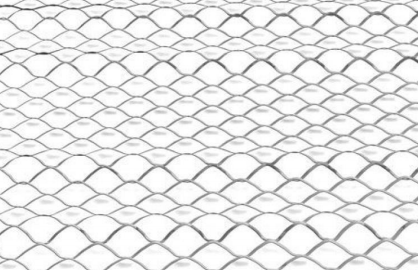
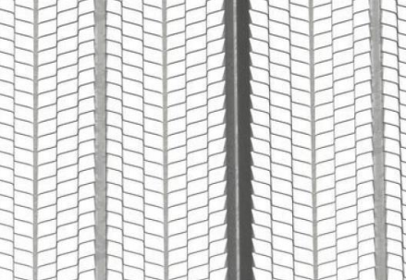
Self-furred diamond mesh metal lath is identical to the above lath, but has dimples or grooves formed into it. This type of diamond mesh metal lath is generally used in applications over solid surfaces such as block, concrete or structural sheathing. The self-furring lath allows the render lock into the metal lath, so the lath would be fully embedded. The lath attaches the render to the structure. Self-furred lath is secured to masonry surfaces with hardened nails or powder driven fasteners at the furring dimples or at the grooves.
Dimpled Diamond Mesh Metal Lath V-grooved Diamond Mesh Metal Lath
Rib lath is the most rigid of all sheet laths and is commonly used for soffits and ceilings. The main difference between rib lath and flat mesh or self-furring is that it contains solid ribs running the length of the sheet. These solid ribs provide additional rigidity to the metal lath. Rib lath can be used on wood or metal studs in open frame construction and on solid surfaces such as block, concrete or structural sheathing. The rib of the sheet should run at right angles to studs. Rib laths are fixed to timber studs using nails, screws or staples. They are fixed to the metal studs using 1.63mm galvanised or stainless steel tying wire. On solid surface the rib laths are fixed with suitable corrosion resistant fixings or stainless steel fixings. Rib lath is availble in galvanised steel and stainless steel.
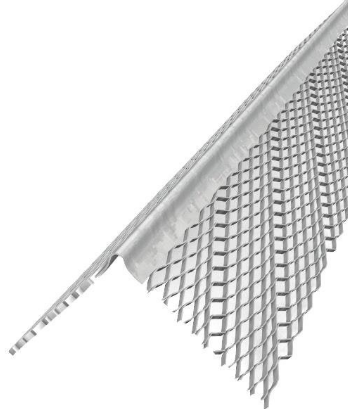
Corner lath (Cornerite) is made from strips of galvanised or stainless steel expanded metal lath bent at about 100 degree angle and are of 43mm or 76mm and 2400mm lengths.
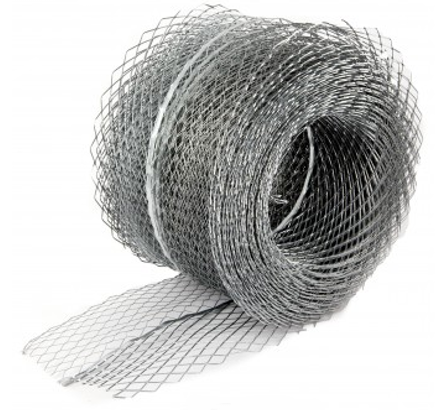
Strip lath is made from strips of galvanised or stainless steel expanded metal lath and are 100 to 150mm wide and 2400mm in length. It is available in strips and coils.
Installation
Metal laths are designed to make plaster jobs easier, more efficient and provide the final product a more professional look. Even though it is difficult to anticipate or prevent plaster cracks, they can be controlled by means of expansion joints. The expansion joints should be installed between laths. The plaster base of walls and ceilings should be divided into rectangular panels with control joint at least every 6m or at the juncture of a dissimilar wall, or in either direction in a length to width ratio of 2 to 1, or in ceilings exceeding 9m2 or walls exceeding 12m2 in area. Standard sheet shears or metal cutting scissors can be used for notching and snipping.
Begin at the right hand bottom corner of the wall. Apply the second sheet to the left of the first sheet lapping lath over lath with at least 25mm lap. Place the third sheet centred above the first two sheets. This staggers the vertical butt joint seams and allows a more uniform dispersal of stress.
Nails shall be driven flush with base on horizontal applications. On vertical applications nails should be bent over to engage at least 3 strands and through rib on rib lath and bridge ribs with staples.
Timber framing: use plasterers nails & screws with washers or staples at 100mm centres. Start at the centre of the sheet and work out towards the edges. Always fix at an angle to allow lath to be pulled tight.
Metal framing: tie with 1.2mm tying wire at 100mm centres. Tie by creating a hairpin shape with the wire, then pull tight and twist. Take care that cut wire ends are not close to plaster surface.
Solid Background: use a suitable fixing with an integral spacer/washer and a large diameter headed screw/nail that will keep the sheets firmly in place 6 fasteners, 4 in the corners and 1 on each side of long edge in centre.
Every finish material is subject to span limitations, which is the maximum distance between frame members. 400mm is the maximum spacing of framing to prevent undue sagging. The maximum spacing of supports may be 600mm for self-furring lath is installed over solid surface or sheathing.
Reinforcing render or plaster with fibreglass mesh
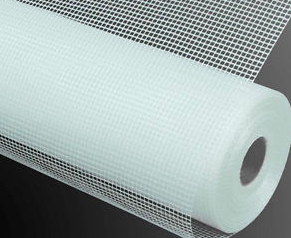
Fibreglass is composed of tiny glass fibres that are produced when glass is heated and extruded into extremely thin threads. Fibreglass mesh is designed for better grip on the rendered wall and supporting the render layer. It protects the finished surface from cracks and improves the mechanical strength of rendered wall. Fibreglass reinforcing mesh must withstand high temperature, humidity and heavy loads. It has resistance to corrosion, anti alkali and acid. Fibreglass is an extremely durable and flexible material. Most fibreglass reinforcing mesh is coated in a plastic resin, which keeps it strong, stiff, and resistant to the alkali properties of any cementitious base coat.
Fibreglass reinforcing mesh can be used in internal plastering and external rendering on solid surfaces and over insulation sheets on the base layer. It is embedded into the base layer in such a way, so it would be completely embedded or locked in. Over the base layer the finishing render is applied. Fibreglass mesh should be installed with an overlap.
The advantage of the fibreglass mesh on rendering systems is its ability to bind the insulation layer or the existing wall into a strong finish. When the mesh is sunk into the adhesive base coat, it provides a solid hardened layer. Should anything happen to the top coat, the fibreglass mesh interwoven into the base coat will not fail, allowing you to make good any damaged sections of the surface render. The weakest point of a building is around the openings, around doors and windows. These openings are additionally reinforced with fibreglass mesh fixed at an angle at the corners.
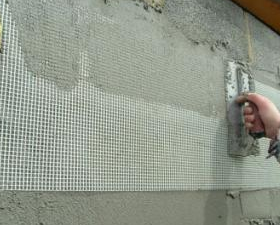
Fibreglass mesh should be installed into the wet basecoat, using the back of a steel trowel and pushed in, so that it sits in the top third. Meshes should be continuous, and should have a minimum 100mm lap with the adjacent mesh. Any meshes that are integral to beads and trims should also allow for 100mm lapping. This ensures strength and continuity of the basecoat.